

This post contains affiliate links. As an Amazon Associate, I earn from qualifying purchases. This comes at no extra cost to you.
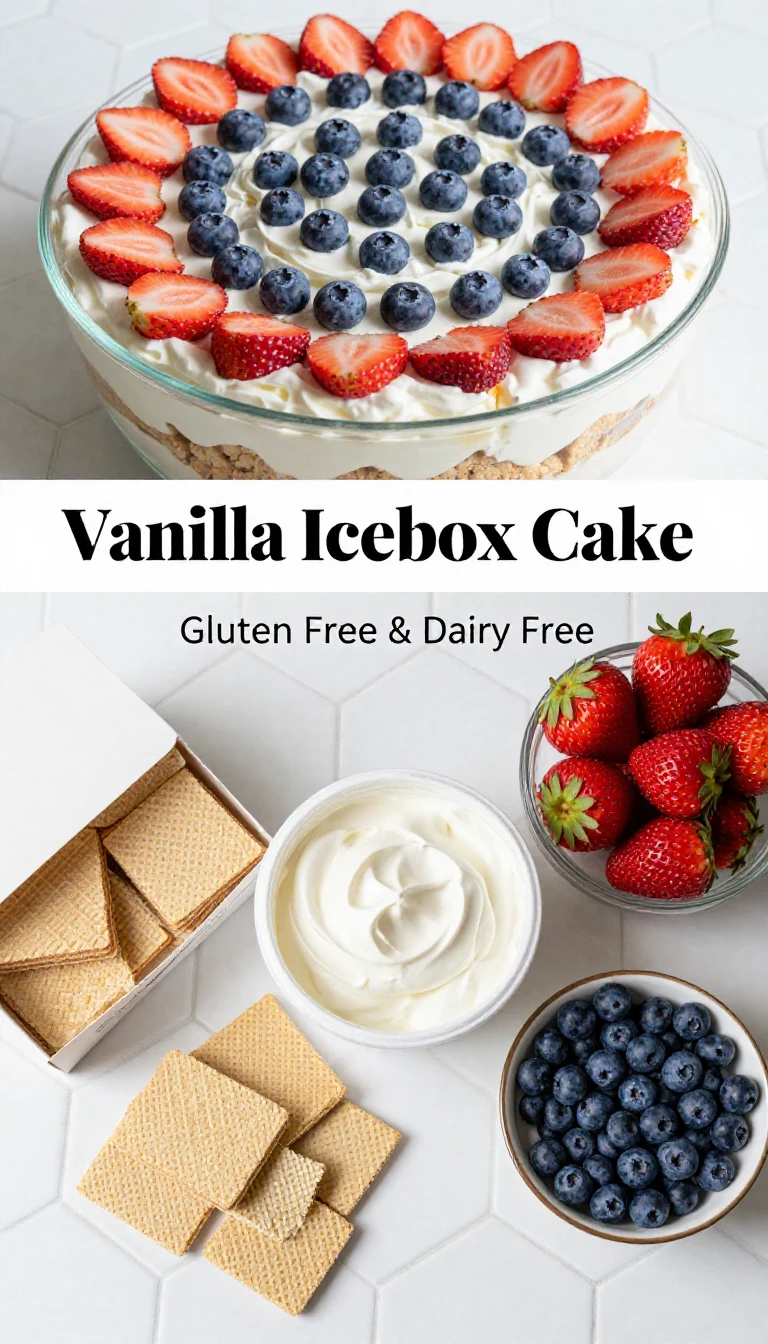
Gluten Free Ice Box Cake
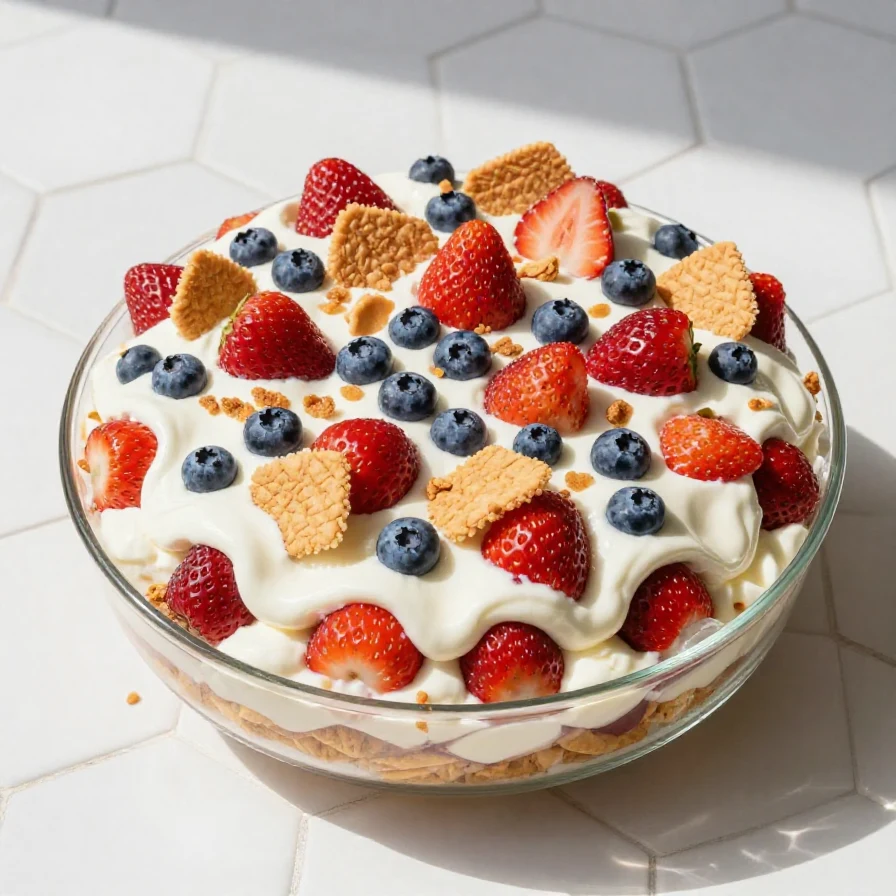
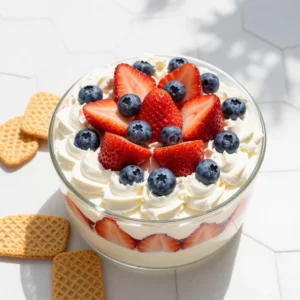
This Gluten Free Ice Box Cake is a showstopper of layers: airy whipped cream, crisp yet tender gluten-free chocolate wafers, and juicy berries. Each bite melts in your mouth, balancing sweetness with a hint of chocolatey richness. Perfect for warm-weather treats, this no-bake dessert becomes even better after a chill session in the fridge.
Table of Contents
Why This Dessert Is Perfect for You
- It’s a no-bake recipe, making it ideal for hot summer days when you want to keep your kitchen cool. The fridge does all the work, leaving you free to relax while the flavors meld.
- The layered design substitutes gluten-free cookies, ensuring everyone at your gathering can enjoy it. No one will guess it’s gluten-free because the texture and taste are so spot-on.
- Its make-ahead convenience allows you to prepare everything the night before. This is especially helpful for busy holidays like Memorial Day or 4th of July.
- Fresh berries brighten each bite, adding a juicy contrast to the creamy layers. The combination feels festive and light, perfect for warm-weather celebrations.
Everything You Need for Gluten Free Ice Box Cake
- 2 cups heavy whipping cream
- 1/2 cup powdered sugar
- 1 teaspoon vanilla extract
- 2 cups gluten-free chocolate wafer cookies
- 1 cup fresh berries (strawberries, blueberries, or raspberries)
- 1/2 cup chocolate shavings or chips (optional)
The gluten-free chocolate wafer cookies are the backbone of this recipe, softening into a cake-like texture as they absorb the whipped cream. Fresh berries not only look beautiful but also provide a juicy sweetness that keeps the dessert from feeling overly rich.
How To Make Gluten Free Ice Box Cake Step by Step
- In a large mixing bowl, whip the heavy whipping cream using an electric mixer until soft peaks form.
- Gradually add the powdered sugar and vanilla extract, continuing to whip until stiff peaks form.
- In a rectangular dish, spread a thin layer of the whipped cream mixture on the bottom.
- Layer gluten-free chocolate wafer cookies on top of the whipped cream, slightly overlapping them.
- Spread another layer of whipped cream over the cookies, and then add a layer of fresh berries.
- Repeat the layering process, alternating between cookies, whipped cream, and berries until all ingredients are used, finishing with a layer of whipped cream on top.
- If desired, sprinkle chocolate shavings or chips on the final layer of whipped cream.
- Cover the dish with plastic wrap and refrigerate for at least 4 hours, or overnight, to allow the cookies to soften.
- Slice and serve chilled, garnished with additional berries if desired.

Makes mixing dough and batters effortless — a kitchen game-changer

Essential for mixing ingredients and easy to clean, perfect for this recipe.
Common Mistakes to Avoid
- Skipping the refrigeration step can leave the cookies too crunchy. Letting the dessert chill at least 4 hours ensures the cookies soften into a cake-like texture.
- Overwhipping the cream can cause it to break and lose its smooth texture. Stop as soon as stiff peaks form, and it will layer perfectly.
- Using overly watery or frozen berries can make the layers soggy. Stick to fresh, firm berries for the best texture.
Easy Ingredient Swaps and Substitutions
- Swap heavy whipping cream with coconut cream for a dairy-free version. The smoothness remains intact, and it adds a faint tropical note.
- Use gluten-free vanilla wafer cookies instead of chocolate wafers for a lighter, sweet flavor profile. This works especially well if you prefer less chocolate intensity.
- If fresh berries aren’t available, try layering thinly sliced bananas or canned peaches. Ensure they’re well-drained to avoid adding excess moisture.
A Brief History of Ice Box Cakes
Ice box cakes originated in the 1920s, when refrigeration became more common in homes. The “ice box” referred to the predecessor of the modern fridge, where these no-bake cakes were chilled to set.
Known for their simplicity, these desserts gained popularity during hot summer months. By using cookies, cream, and simple layers, they became a go-to treat that required minimal effort yet delivered maximum satisfaction.
Looking for something similar? Try our delightful 4th of july mini.
For more ideas, check out our patriotic mini ice cream sandwiches.
You might also enjoy our flag fruit pizza: a patriotic.
Frequently Asked Questions
-
Can I make this dessert ahead of time?
Yes, it’s best made at least 4 hours in advance or even the night before. This gives the cookies time to soften and the flavors to meld. -
Can I substitute the berries with something else?
Absolutely! Thinly sliced bananas, canned peaches, or even kiwi slices work well. Just make sure to pat them dry to avoid excess moisture. -
How long will leftovers keep?
Store leftovers in an airtight container in the fridge for up to 2 days. Beyond that, the layers may lose their texture.
Gluten Free Ice Box Cake
Ingredients
- 2 cup heavy whipping cream
- 1/2 cup powdered sugar
- 1 tsp vanilla extract
- 2 cup gluten-free chocolate wafer cookies
- 1 cup fresh berries (strawberries, blueberries, or raspberries)
- 1/2 cup chocolate shavings or chips optional
Instructions
- In a large mixing bowl, whip the heavy whipping cream using an electric mixer until soft peaks form.
- Gradually add the powdered sugar and vanilla extract, continuing to whip until stiff peaks form.
- In a rectangular dish, spread a thin layer of the whipped cream mixture on the bottom.
- Layer gluten-free chocolate wafer cookies on top of the whipped cream, slightly overlapping them.
- Spread another layer of whipped cream over the cookies, and then add a layer of fresh berries.
- Repeat the layering process, alternating between cookies, whipped cream, and berries until all ingredients are used, finishing with a layer of whipped cream on top.
- If desired, sprinkle chocolate shavings or chips on the final layer of whipped cream.
- Cover the dish with plastic wrap and refrigerate for at least 4 hours, or overnight, to allow the cookies to soften.
- Slice and serve chilled, garnished with additional berries if desired.
Notes
Loved this recipe? Save it to your favorite Pinterest board so you can easily find it later! ✨