

Table of contents
- What Are Golden Kiwi Chips?
- Nutritional Benefits of Golden Kiwi
- Essential Ingredients for Golden Kiwi Chips
- Step-by-Step Guide to Making Kiwi Chips in the Oven
- Best Oven Temperature and Time for Dehydrating Kiwi
- Tips for Achieving the Perfect Crispiness
- Alternative Methods: Dehydrator vs. Air Fryer
- Flavor Variations and Seasoning Options
- How to Store Golden Kiwi Chips for Long-Lasting Freshness
- Creative Ways to Enjoy Golden Kiwi Chips
- Are Golden Kiwi Chips Healthier Than Store-Bought Snacks?
- FAQs About Golden Kiwi Chips
Estimated reading time: 11 minutes
What Are Golden Kiwi Chips?
Golden kiwi chips are a delicious and healthy snack made by thinly slicing golden kiwis and baking them in the oven until they are crisp and crunchy. Golden kiwis, known for their smooth, golden-yellow skin and sweet, tropical flavor, are packed with nutrients such as vitamin C, potassium, and fiber. This makes them an excellent choice for a nutritious alternative to traditional potato chips.
The process of making golden kiwi chips is simple yet rewarding. By carefully slicing the kiwis and baking them at a low temperature, you retain most of their natural flavors and nutrients while achieving a satisfying crunch. The natural sweetness of the golden kiwi gives the chips a pleasant, unique flavor that sets them apart from other fruit chips.
These chips are not only a healthy snack, but they also serve as a great addition to salads, bowls, or as a garnish for various dishes. If you’re looking for a fun way to enjoy fruit and add a touch of creativity to your snacks, golden kiwi chips might be the perfect option.
Nutritional Benefits of Golden Kiwi
Golden kiwi is a powerhouse of nutrients, making it an excellent choice for those seeking a healthy snack or supplement to their diet. Packed with vitamin C, golden kiwi supports the immune system and helps promote skin health. A single fruit provides more vitamin C than an orange, which contributes to better collagen production and overall skin elasticity.
In addition to vitamin C, golden kiwi is rich in fiber, which aids in digestion and supports gut health. Fiber also helps to maintain stable blood sugar levels, making it an ideal choice for those looking to manage their weight or improve digestive function. Moreover, golden kiwi contains a high amount of potassium, which is essential for maintaining heart health and regulating blood pressure.
Golden kiwi is also a good source of antioxidants, such as vitamin E, which help protect cells from oxidative damage. These antioxidants contribute to reduced inflammation and support overall cellular function. With its low calorie content and high nutrient density, golden kiwi makes for a perfect addition to a balanced and health-conscious diet.
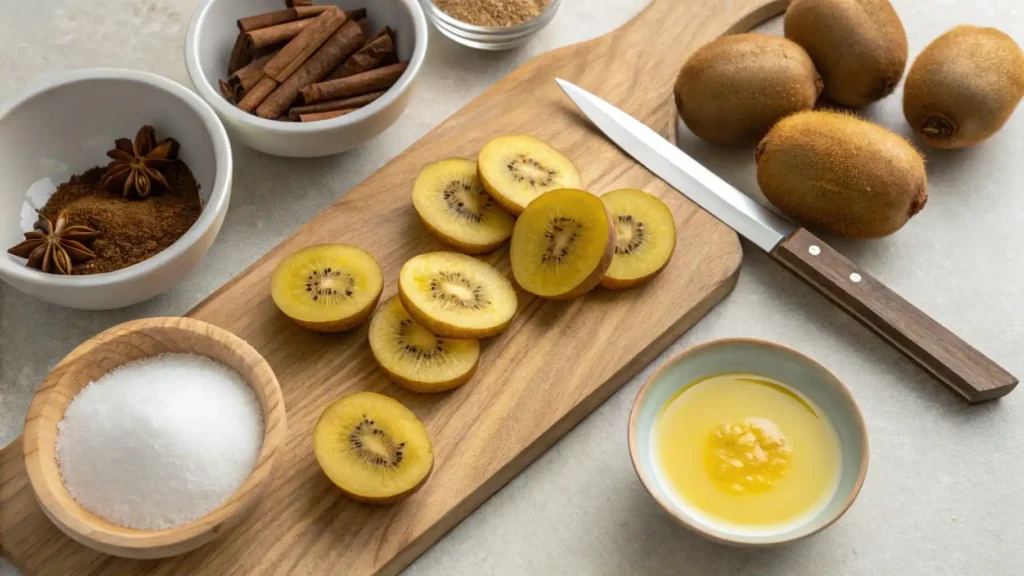
Essential Ingredients for Golden Kiwi Chips
To make golden kiwi chips, there are just a few simple ingredients needed to create this flavorful and nutritious snack. The star ingredient is, of course, the golden kiwi. It’s important to select ripe, fresh kiwis for the best texture and taste. The fruit should have a smooth, golden-yellow skin and a firm yet slightly soft feel when gently squeezed.
Next, you will need a small amount of olive oil or another light oil to coat the kiwi slices before baking. This helps achieve a crispy texture while adding a subtle richness to the chips. A light sprinkle of salt is also used to balance the natural sweetness of the kiwi, enhancing its flavor without overpowering it. Depending on personal preference, a pinch of cinnamon or honey can be added to give the chips a unique twist.
Finally, lemon juice can be used to prevent the kiwi from browning during the preparation process, keeping the chips fresh-looking. These ingredients come together to create a healthy, flavorful snack that is easy to prepare and a great way to enjoy golden kiwis in a new form.
Step-by-Step Guide to Making Kiwi Chips in the Oven
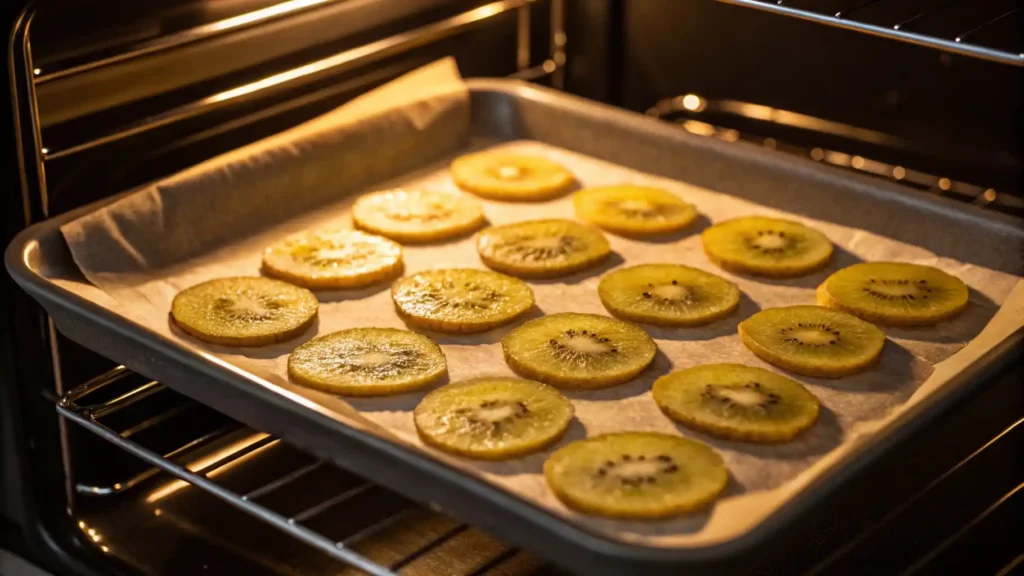
Making golden kiwi chips in the oven is a simple process that requires just a few steps. First, start by preheating the oven to a low temperature, around 200°F (93°C). This low heat is key to slowly drying out the kiwi slices and achieving the perfect crispiness without burning them.
Next, carefully peel the golden kiwis and slice them thinly, about 1/8 inch thick. The thinner the slices, the crispier the chips will be. Arrange the slices in a single layer on a baking sheet lined with parchment paper to prevent sticking.
Lightly coat each slice with olive oil using a brush or by drizzling it over the slices. This will help the chips crisp up during baking. Sprinkle a small amount of salt on top of the kiwi slices to balance the flavor, or add a dash of cinnamon if you prefer a hint of spice.
Bake the kiwi slices for 2-3 hours, checking periodically to avoid over-baking. Once they are golden brown and crispy, remove them from the oven and let them cool. These homemade golden kiwi chips make for a healthy, delicious snack or garnish.
Best Oven Temperature and Time for Dehydrating Kiwi
When dehydrating golden kiwi in the oven, it’s important to maintain the right temperature and baking time to achieve a crisp and evenly dried texture. The ideal oven temperature for dehydrating kiwi is 200°F (93°C). This low and steady heat will slowly remove the moisture from the kiwi slices without burning them.
It’s best to bake the kiwi slices for 2 to 3 hours, depending on their thickness and the moisture content of the fruit. Thinner slices will dry out more quickly, while thicker ones may take a little longer. To ensure an even result, check the slices periodically and rotate the baking sheet halfway through the process.
You can test the chips by removing one slice and allowing it to cool for a minute. If it crisps up and becomes crunchy, the kiwi chips are ready. If they still feel soft, continue baking in 10-15 minute intervals until they reach the desired texture.
By baking at this temperature and for this length of time, you can create perfectly dehydrated golden kiwi chips that are crunchy, flavorful, and full of nutrients.
Tips for Achieving the Perfect Crispiness
Achieving the perfect crispiness when making golden kiwi chips requires attention to detail throughout the process. Start by slicing the kiwis as evenly as possible. Thinner slices, around 1/8 inch thick, will dehydrate more quickly and become crunchier. If some slices are thicker than others, they may remain chewy, so it’s important to maintain uniformity for consistent results.
Before placing the kiwi slices on the baking sheet, lightly coat them with a small amount of oil. This will help in creating a crispy outer layer. Avoid overloading the baking sheet by ensuring the slices are arranged in a single layer, with no overlapping. Crowded slices may trap moisture and prevent proper drying.
During baking, keep the oven door slightly ajar to allow moisture to escape and ensure better airflow around the kiwi slices. Regularly check on the chips, and don’t hesitate to flip them midway through the baking process to promote even crispiness.
Lastly, after removing the kiwi chips from the oven, let them cool on a wire rack. This will help prevent them from becoming soft due to trapped heat.
Alternative Methods: Dehydrator vs. Air Fryer
When making golden kiwi chips, there are a few alternative methods to using the oven: the dehydrator and the air fryer. Both appliances can help you achieve crispy kiwi chips, but they differ in their approach and results.
A dehydrator is designed to dry out food by circulating warm air at a low temperature. This method preserves the fruit’s nutrients and natural flavor while removing moisture gradually. Dehydrators can take longer, usually around 6 to 12 hours, depending on the thickness of the slices. This process is ideal for making large batches, as the fruit doesn’t need constant attention. The result is often a uniform, crispy texture.
On the other hand, an air fryer works by rapidly circulating hot air at higher temperatures, which reduces the cooking time significantly. Air fryers typically take between 30 to 60 minutes to make golden kiwi chips, depending on the thickness of the slices. While the texture might be slightly different from the dehydrator, the air fryer produces chips with a similar crispiness and golden-brown color.
Both methods have their merits, and the choice depends on time and texture preferences. The dehydrator is great for a slow, gentle drying process, while the air fryer provides quicker results with a slightly different texture.
Flavor Variations and Seasoning Options
Golden kiwi chips can be customized with a variety of seasonings to match your taste preferences. While a basic salt coating works well, there are numerous ways to add flavor complexity and variety to your chips.
For a sweeter version, consider adding a light drizzle of honey or a sprinkle of cinnamon. These flavors complement the natural sweetness of the kiwi and create a balanced, flavorful snack. You can also try combining vanilla extract with a bit of brown sugar for a comforting, dessert-like chip.
If you prefer a savory option, garlic powder and onion powder can provide depth and richness. A pinch of paprika or cayenne pepper will add a touch of heat to balance the sweetness of the kiwi. For an extra savory punch, parmesan cheese can be sprinkled on the chips after they’ve finished baking, adding a delightful sharpness.
Herb options like rosemary or thyme can create a fragrant, earthy twist. Experiment with different combinations of these seasonings to find the perfect balance that suits your taste and turns your golden kiwi chips into a unique, flavorful treat.
How to Store Golden Kiwi Chips for Long-Lasting Freshness
Proper storage is key to keeping golden kiwi chips fresh and crispy for as long as possible. Once the chips have cooled completely, it is essential to store them in an airtight container to prevent moisture from entering. This helps maintain their crisp texture and flavor.
To further protect the chips, place a desiccant packet or a small piece of paper towel in the container. This will absorb any excess moisture, which can make the chips soggy. Make sure to store the container in a cool, dry place, away from direct sunlight. A pantry or kitchen cupboard is ideal.
If you want to store the chips for an extended period, you can also refrigerate them, though this may alter the texture slightly. For longer storage, consider vacuum-sealing the chips to remove any air. This method helps maintain their crunch and freshness for months.
When you’re ready to enjoy your chips again, you can re-crisp them in the oven or air fryer for a few minutes to restore their crunch. Proper storage ensures that your homemade golden kiwi chips remain a delicious and healthy snack for an extended period.
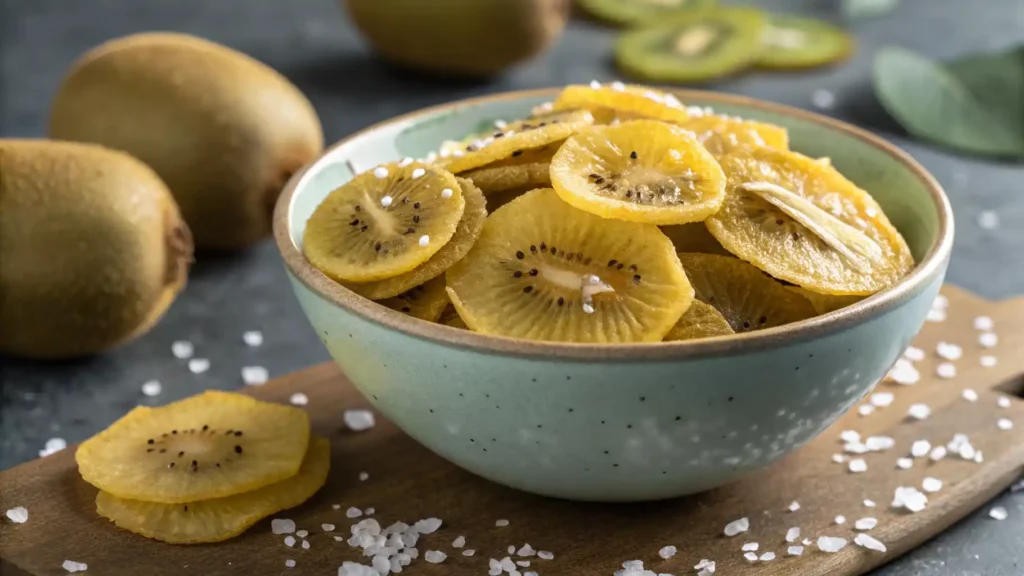
Creative Ways to Enjoy Golden Kiwi Chips
Golden kiwi chips are not only delicious on their own, but they also make an excellent addition to a variety of dishes. One creative way to enjoy them is by topping a fruit salad with these crispy chips. Their sweet and tangy flavor pairs beautifully with fresh fruits like berries, citrus, and pineapple, adding both texture and taste.
For a unique snack, try adding golden kiwi chips to a yogurt parfait. Layer the chips with Greek yogurt, honey, and a sprinkle of granola for a refreshing and satisfying treat. You can also crumble the chips on top of smoothie bowls, adding a crispy contrast to the creamy texture of the smoothie.
IIf you’re looking for a more detailed guide on how to make these delicious chips, check out this golden kiwi chips recipe oven for step-by-step instructions and tips. Pair them with leafy greens, feta cheese, and a light vinaigrette dressing for a healthy, flavorful dish.
Golden kiwi chips can also be served as a side to a savory dish, like grilled chicken or fish. Their natural sweetness balances well with the savory flavors of the main course, making them a versatile and exciting addition to many meals.
Are Golden Kiwi Chips Healthier Than Store-Bought Snacks?
Golden kiwi chips can be a much healthier alternative to many store-bought snacks. One key difference is the ingredients used. While store-bought chips often contain preservatives, artificial flavors, and unhealthy fats, homemade golden kiwi chips are made from fresh fruit and a small amount of oil, making them a more natural option.
Additionally, golden kiwi chips are rich in fiber, vitamin C, and antioxidants, which support digestion, boost the immune system, and help protect against oxidative stress. Many processed snacks are high in added sugars or unhealthy fats, which can contribute to weight gain and health problems when consumed in excess. Golden kiwi chips, on the other hand, offer a nutrient-dense snack without excessive calories or artificial additives.
Another advantage of making your own kiwi chips is that you can control the amount of salt or other seasonings, avoiding the high sodium content often found in packaged snacks. This makes golden kiwi chips a heart-healthy option that provides a satisfying crunch while offering important nutrients.
Overall, golden kiwi chips can be a more wholesome and nutritious choice compared to many store-bought alternatives, making them a great snack option for health-conscious individuals.
FAQs About Golden Kiwi Chips
Golden kiwi chips are ready when they are crisp and golden brown. To check for doneness, remove one chip and let it cool for a minute. If it is crispy and not soft in the middle, the chips are done. If they are still chewy, continue baking in 10-15 minute intervals until fully dried.
Yes, you can make golden kiwi chips without oil, although using a small amount helps achieve a crispier texture. If you prefer to avoid oil, simply bake the kiwi slices as they are, but be mindful that the chips may be slightly less crisp.
Yes, you can store golden kiwi chips for an extended period. To keep them fresh, store the chips in an airtight container in a cool, dry place. You can also refrigerate or vacuum-seal them for longer shelf life. Be sure to keep moisture out to maintain their crunch.
Absolutely! You can apply the same method to other fruits such as bananas, apples, or strawberries. Just remember that different fruits have varying moisture content, so baking times may need to be adjusted based on the fruit’s thickness and water content.